How to Make a Wood Headboard in 7 Easy DIY Steps
Looking to add a touch of rustic charm or modern elegance to your bedroom? Wondering how to make a wood headboard that reflects your personal style and creativity? You’re in the right place! Crafting your own wood headboard is a rewarding DIY project that allows you to customize your bedroom decor and create a cozy sanctuary for rest and relaxation. In this comprehensive guide, we’ll walk you through the step-by-step process of bringing your vision to life, from gathering materials to final installation.
Let’s get started on how to make a wood headboard!
Table of Contents
Toggle1. Gather Materials and Tools:
As a DIY bedding professional, I always start by gathering all the necessary materials and tools for any project. For crafting a wood headboard, you’ll need:
- Wood planks or a large piece of wood, sized to fit the width of your bed. Opt for high-quality wood that suits your aesthetic preferences and budget.
- A saw, such as a circular saw or jigsaw, to cut the wood to the desired size and shape.
- Sandpaper or a sander to smooth out any rough edges and surfaces of the wood, ensuring a flawless finish.
- Wood stain or paint (optional) to enhance the appearance of the wood. Choose a color or finish that complements your bedroom decor and personal style.
- Wood screws or nails to securely fasten the wood pieces together. Ensure they are long enough to provide a strong hold.
- A drill or hammer to attach mounting hardware and secure the headboard in place.
Before diving into the project, take the time to gather all these materials and tools. Having everything on hand will streamline the process and ensure a smooth crafting experience.
2. Measure and Cut the Wood:
Precise measurements are crucial when crafting a wood headboard to ensure it fits perfectly with your bed frame and bedroom decor. Here’s how to get it right:
- Measure the Width of Your Bed: Start by measuring the width of your bed. This will determine the size of your headboard. Consider the dimensions of your mattress and any additional space you want the headboard to occupy on either side.
- Select Your Wood: Based on your measurements, choose the wood for your headboard. You can opt for a single large piece of wood or multiple planks for a layered look. Ensure the wood is thick enough to provide durability and support.
- Mark and Cut the Wood: Using a saw, such as a circular saw or jigsaw, carefully cut the wood to the desired size and shape. Double-check your measurements before cutting to avoid any errors. If you’re creating a design or pattern with multiple planks, be precise in your cuts to ensure they fit together seamlessly.
- Smooth Out Edges: After cutting, use sandpaper or a sander to smooth out any rough edges and surfaces of the wood. This step is essential for achieving a professional-looking finish and preventing splinters.
By taking the time to measure and cut the wood accurately, you’ll lay the foundation for a beautifully crafted wood headboard that perfectly complements your bedroom decor.
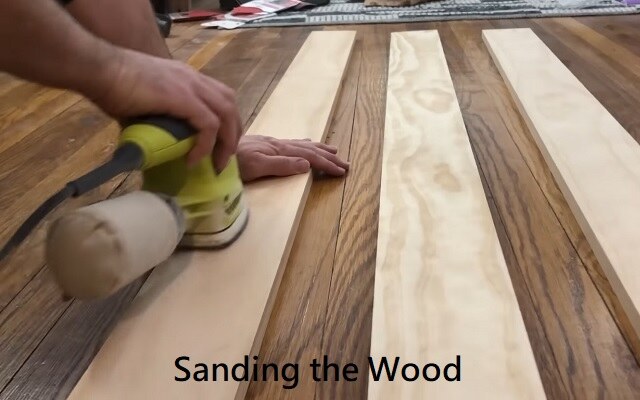
3. Sand the Wood:

Now that you’ve cut the wood to the desired size and shape, it’s time to smooth out any rough edges and surfaces. Sanding the wood will not only improve its appearance but also ensure a comfortable and safe headboard for your bed. Here’s how to sand wood like a pro:
- Choose the Right Sandpaper: Select sandpaper with the appropriate grit for your wood type and desired finish. Coarse grit sandpaper (around 80-100) is ideal for smoothing rough surfaces, while finer grit sandpaper (120-220) is suitable for achieving a polished finish.
- Start Sanding: Begin by sanding the edges and surfaces of the wood using smooth, even strokes. Be sure to sand with the grain of the wood to avoid causing scratches or damage.
- Focus on Problem Areas: Pay special attention to any rough spots, knots, or imperfections in the wood. Use extra care and pressure to smooth out these areas until they are level with the rest of the surface.
- Progress to Finer Grits: Once you’ve smoothed out the wood with coarse grit sandpaper, switch to a finer grit sandpaper to achieve a silky-smooth finish. Continue sanding until the wood feels smooth and free of any roughness.
- Remove Dust: After sanding, use a clean, dry cloth or a vacuum to remove any dust or debris from the wood surface. This will ensure a clean surface for staining or painting, if desired.
By sanding the wood thoroughly, you’ll not only enhance its appearance but also create a comfortable and inviting surface for your wood headboard.
4. Design the Headboard (Optioal):
Designing your headboard is where your creativity can truly shine. Whether you choose to create a simple, sleek design or opt for intricate patterns and details, there are various ways to approach this step. Let’s explore two methods: designing with a CNC machine or designing manually.
Using a CNC Machine:
- Create a Digital Design: Start by sketching out your headboard design on paper or using digital design software. This will serve as the blueprint for your CNC machine.
- Convert Design to CNC Format: Once you have your design, use CAD (Computer-Aided Design) software to convert it into a format compatible with your CNC machine. This may involve programming specific toolpaths and dimensions for the machine to follow.
- Select Your Wood: Choose a suitable wood material for your headboard. Hardwoods like oak, maple, or walnut are popular choices for CNC projects due to their durability and aesthetic appeal.
- Set Up the CNC Machine: Prepare your CNC machine for the milling process. This includes securing the wood material to the machine bed and loading the CNC program containing your design.
- Execute the Design: Start the CNC machine and watch as it precisely cuts and carves your headboard design into the wood material. The machine’s precision and accuracy will ensure consistent results and intricate detailing.
- Look for CNC Professional Help: If you Don’t have a CNC machine or you think it’s a crucial step, bring it to the CNC professional to design your headboard with your favourite design.
Designing Manually:
- Sketch Your Design: Begin by sketching out your headboard design on paper. Consider the size and shape of your headboard, as well as any patterns or motifs you want to incorporate.
- Transfer Design to Wood: Once you have your design finalized, transfer it onto the wood surface using a pencil or chalk. You can use a ruler or straight edge to ensure straight lines and accurate proportions.
- Carve or Cut the Design: Depending on your design complexity, you can use a variety of tools to carve or cut the wood. For intricate detailing, consider using wood carving chisels or rotary tools. For simpler designs, a jigsaw or handsaw may suffice.
- Refine and Smooth: After carving or cutting, use sandpaper or a sander to refine the edges and surfaces of your headboard. Smooth out any rough spots or imperfections to achieve a polished finish.
- Add Finishing Touches: Once your headboard design is complete, consider adding additional elements such as staining, painting, or wood burning to enhance its appearance.
Whether you choose to design your headboard with a CNC machine for precision or opt for a hands-on approach, the key is to let your creativity flow and create a headboard that reflects your personal style and taste.
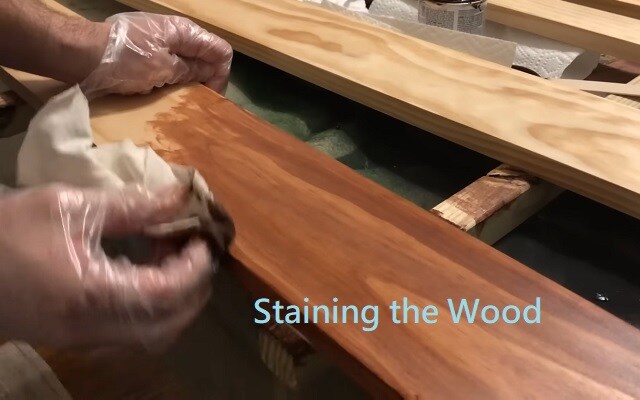
5. Stain or Paint the Wood (Optional):

Adding a stain or paint to your wood headboard is an optional but rewarding step that can enhance its appearance and complement your bedroom decor. Here’s how to approach this part of the process:
- Choose Your Finish: Decide whether you want to stain or paint the wood. Staining allows the natural beauty of the wood grain to show through, while painting provides an opportunity to add color and personality to your headboard.
- Prepare the Surface: If you’ve opted to stain the wood, ensure that it is clean and free of any dust or debris from sanding. If you’re painting, consider applying a primer first to create a smooth, even surface for the paint to adhere to.
- Apply the Stain or Paint: Using a brush, roller, or sprayer, apply the stain or paint to the wood in smooth, even strokes. Work in the direction of the wood grain to ensure an even finish. Apply multiple coats as needed, allowing each coat to dry completely before applying the next.
- Allow for Drying Time: After applying the stain or paint, allow the wood to dry completely according to the manufacturer’s instructions. This may take several hours or even overnight, depending on the type of finish used and environmental conditions.
- Consider a Sealant (Optional): For added protection and durability, consider applying a clear sealant or topcoat over the stain or paint once it has dried completely. This will help to protect the wood from scratches, moisture, and other damage over time.
- Reassemble (if Necessary): If you’ve stained or painted the wood pieces separately before assembly, wait until they are completely dry before reassembling the headboard. This will prevent any smudging or damage to the finish.
By staining or painting the wood, you can customize your headboard to perfectly suit your personal style and bedroom decor.
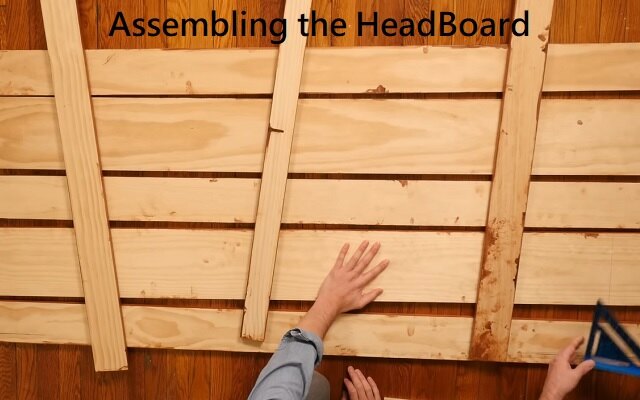
6. Assemble the Headboard:

With the wood prepared and finished to your liking, it’s time to assemble the headboard. Whether you’re working with a single large piece of wood or multiple planks, this step will bring your vision to life. Here’s how to proceed:
- Arrange the Wood Pieces: If you’re using multiple wood planks, lay them out side by side on a flat surface to create the desired pattern or design for your headboard. Take your time to ensure the arrangement is visually appealing and balanced.
- Secure the Wood Pieces Together: Once you’re satisfied with the layout, use wood screws or nails to attach the wood pieces together. Place screws or nails along the edges and at regular intervals across the surface to ensure a sturdy and secure attachment. Be sure to pre-drill holes to prevent splitting the wood.
- Check for Stability: After securing the wood pieces together, check the headboard for stability. Gently shake or wiggle it to ensure there is no movement or wobbling. If necessary, reinforce the attachment points with additional screws or nails.
- Attach Mounting Hardware: Determine how you’ll mount the headboard to your bed frame or wall. For bed frame attachment, you can use brackets that screw into the back of the headboard and attach to the frame. If wall-mounting, consider installing a French cleat or heavy-duty picture hanging hardware.
- Secure the Mounting Hardware: Use a drill to attach the mounting hardware securely to the back of the headboard. Follow the manufacturer’s instructions for installation to ensure a strong and stable attachment.
- Test Fit: Before final installation, do a test fit to ensure the headboard aligns properly with your bed frame or wall. Make any necessary adjustments to the mounting hardware or placement of the headboard as needed.
With the headboard assembled and mounting hardware attached, you’re one step closer to completing your DIY wood headboard project.
7. Attach Mounting Hardware:
Properly attaching mounting hardware is essential for securely installing your wood headboard to your bed frame or wall. Here’s how to proceed with this crucial step:
- Determine Mounting Method: Decide whether you’ll be attaching the headboard directly to your bed frame or mounting it on the wall behind your bed. The method you choose will dictate the type of mounting hardware you’ll need.
- Select Suitable Hardware: For bed frame attachment, consider using brackets that can be screwed into the back of the headboard and then attached to the frame. Ensure the brackets are sturdy enough to support the weight of the headboard. If wall-mounting, opt for a French cleat or heavy-duty picture hanging hardware designed to hold heavy objects securely.
- Position the Hardware: Place the mounting hardware in the desired location on the back of the headboard. For bed frame attachment, position the brackets evenly along the width of the headboard, ensuring they align with the frame. If wall-mounting, position the French cleat or hanging hardware centrally on the back of the headboard.
- Secure the Hardware: Once the hardware is positioned correctly, use a drill and appropriate screws to attach it securely to the back of the headboard. Be sure to use screws that are long enough to penetrate the wood and provide a strong hold. Double-check that the hardware is level and securely fastened before proceeding.
- Prepare the Mounting Surface: If you’re attaching the headboard to the wall, ensure the mounting surface is clean and free of any debris. Use a stud finder to locate wall studs for added stability, if possible. Mark the positions where the headboard will be mounted with a pencil.
- Install the Headboard: With the mounting hardware securely attached to the back of the headboard, it’s time to install it in its final position. For bed frame attachment, align the headboard with the frame and attach the brackets to the frame using screws or bolts. For wall-mounting, carefully hang the headboard on the mounting hardware, ensuring it is level and securely in place.
By following these steps, you’ll ensure that your wood headboard is securely attached to your bed frame or wall, providing both stability and style to your bedroom decor.
Conclusion:
Congratulations on completing your DIY wood headboard project! With careful craftsmanship and attention to detail, you’ve created a stunning centerpiece for your bedroom. Enjoy the cozy ambiance and personalized touch it brings to your space. Here’s to many restful nights and joyful moments in your beautifully crafted bedroom oasis! If you have any questions or need further assistance, feel free to reach out. Happy crafting!
Also Read the next procedure: How to Attach Headboard to Bed Frame
Share this:
- Click to share on Facebook (Opens in new window) Facebook
- Click to share on X (Opens in new window) X
- Click to email a link to a friend (Opens in new window) Email
- Click to share on LinkedIn (Opens in new window) LinkedIn
- Click to share on Reddit (Opens in new window) Reddit
- Click to share on X (Opens in new window) X
- Click to share on Tumblr (Opens in new window) Tumblr
- Click to share on Pinterest (Opens in new window) Pinterest
- Click to share on Pocket (Opens in new window) Pocket
- Click to share on Telegram (Opens in new window) Telegram
- Click to share on WhatsApp (Opens in new window) WhatsApp
- Click to share on Nextdoor (Opens in new window) Nextdoor

Pingback: 12 Types Of Bed Headboards By Creative Design - Bedding Expertise