6 Easy DIY Steps on How to Make Bed Slats
Creating your own bed slats can be a rewarding DIY project that not only saves you money but also allows you to customize your bed for better support and comfort. Bed slats are essential components that provide a foundation for your mattress, ensuring even weight distribution and preventing sagging. In this guide, we’ll walk you through the process of how to make bed slats, offering a step-by-step approach to help you craft sturdy and durable slats for your bed frame.
Table of Contents
ToggleWhy Make Your Own Bed Slats?
Many people opt to make their own bed slats for various reasons. Custom bed slats can be tailored to fit any bed frame perfectly, providing a level of personalization that pre-made slats might not offer. Additionally, making your own slats can be a cost-effective solution, especially if you have leftover wood or can source materials at a low cost. Furthermore, DIY bed slats can be made from higher-quality materials than some of the cheaper options available in stores, resulting in a more durable and longer-lasting product.
What Are Bed Slats?

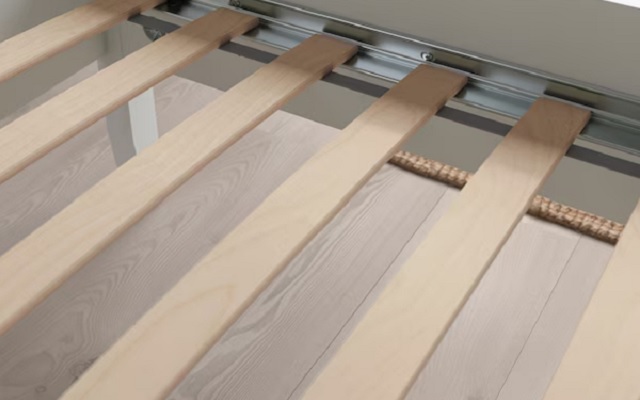
Bed slats are a series of horizontal wooden planks that lay across the width of your bed frame. They support your mattress, eliminating the need for a box spring. There are two main types of bed slats: solid and sprung. Solid slats are rigid and provide a firm foundation, while sprung slats are slightly curved and offer a bit more flexibility and cushioning. Both types have their own benefits, and the choice between them depends on your personal preference and the type of mattress you use.
The Importance of Quality Bed Slats
Quality bed slats are crucial for the longevity of your mattress and the comfort of your sleep. Poorly made or weak slats can lead to an uneven sleeping surface, which can cause discomfort and even back pain over time. Strong, well-constructed slats ensure that your mattress is evenly supported, which not only enhances comfort but also extends the life of your mattress by preventing sagging and wear.
In this guide, we will cover everything you need to know about how to make bed slats, from the tools and materials required to the step-by-step process of measuring, cutting, assembling, and installing them. By the end of this guide, you’ll have the knowledge and confidence to create your own bed slats, tailored to your specific needs and preferences.
1. Understanding Bed Slats
- Definition and Purpose
- Bed slats are a series of horizontal wooden planks that lay across the width of your bed frame, providing a foundation for your mattress.
- They eliminate the need for a box spring by ensuring even weight distribution and preventing sagging.
- Types of Bed Slats
- Solid Slats: Rigid and provide a firm foundation.
- Sprung Slats: Slightly curved and offer more flexibility and cushioning.
- Materials Used
- Common materials include wood (such as pine or oak) and metal.
- Wooden slats are popular for their durability and ease of customization.
2. Tools and Materials Needed
Before you begin making your bed slats, it’s essential to gather all the necessary tools and materials. Having everything prepared beforehand will make the process smoother and more efficient. Here’s a comprehensive list of what you’ll need:
List of Tools

- Saw: A handsaw or circular saw for cutting the wood to the desired length.
- Measuring Tape: For accurate measurements of your bed frame and the slats.
- Drill: To create pilot holes for screws if you’re attaching the slats to the bed frame.
- Screws: To secure the slats to the bed frame (optional, depending on your design).
- Sandpaper: For smoothing the edges and surfaces of the slats to avoid splinters.
- Safety Gear: Gloves, safety goggles, and a dust mask to protect yourself while working.
Materials
- Wood: Choose sturdy wood such as pine, oak, or birch. The amount and length will depend on the size of your bed frame.
- Recommended Dimensions: Typically, slats are about 2-4 inches wide, 1 inch thick, and should span the width of your bed frame.
- Screws or Brackets: Depending on your assembly method, these may be necessary to secure the slats.
Safety Gear
- Gloves: To protect your hands from splinters and cuts.
- Safety Goggles: To shield your eyes from wood chips and dust.
- Dust Mask: To prevent inhalation of wood dust while cutting and sanding.
Preparing Your Workspace
- Clean and Organize: Ensure your workspace is clean and free of clutter to avoid accidents.
- Adequate Lighting: Make sure your workspace is well-lit to see measurements and cuts clearly.
- Ventilation: If working indoors, ensure good ventilation to avoid inhaling dust and fumes.
Tips for Choosing Materials
- Quality of Wood: Opt for straight, knot-free boards for the best results. Warped or knotted wood can affect the stability and durability of the slats.
- Sustainability: Consider using sustainably sourced wood to reduce environmental impact.
Gathering these tools and materials will set you up for a successful DIY project. Being well-prepared means you can focus on the construction process without unnecessary interruptions. In the next section, we’ll delve into the specifics of measuring and cutting the slats to ensure they fit perfectly in your bed frame.
3. Measuring and Cutting the Slats
Accurate measurements and precise cuts are crucial when making bed slats. This ensures they fit perfectly within your bed frame and provide consistent support for your mattress. Follow these steps to measure and cut your slats correctly:
Measure the Bed Frame

- Inside Width and Length: Measure the inside width and length of your bed frame where the slats will be placed. It’s essential to get precise measurements to avoid gaps or slats that are too tight.
- Use a measuring tape to determine the distance from one side of the frame to the other for both the width and length.
- Account for Support Bars: If your bed frame has central support bars, measure the distance between these bars and the edges of the frame. This will help you decide on the length of each slat segment if you need to cut them into smaller pieces.
- Number of Slats: Determine how many slats you’ll need based on the width of your bed. Generally, slats are spaced about 2-3 inches apart to provide adequate support.
- For example, a typical queen-size bed might require about 10-12 slats.
Determine the Length and Width of Slats
- Length: The length of each slat should match the inside width of your bed frame. Ensure your measurements are precise, and double-check before cutting.
- Example: If the inside width of your bed frame is 60 inches, each slat should be 60 inches long.
- Width and Thickness: The width and thickness of the slats can vary based on preference and the type of mattress you have. A common size is 2-4 inches wide and 1 inch thick.
Cutting the Wood
- Mark the Measurements: Use a pencil and measuring tape to mark the length of each slat on the wood. Ensure the marks are clear and accurate.
- Cut the Wood: Using a saw (handsaw or circular saw), carefully cut along the marked lines. Make sure to cut straight to ensure each slat is uniform in length.
- Safety Tip: Wear safety goggles and gloves while cutting to protect yourself from wood chips and splinters.
- Smooth the Edges: After cutting, use sandpaper to smooth the edges and surfaces of each slat. This helps prevent splinters and ensures the slats fit snugly into the bed frame.
- Sand the edges lightly until they are smooth to the touch.
- Optional Treatment: If desired, you can apply a wood finish or sealant to the slats to protect the wood and enhance its appearance. This step is optional but recommended for added durability.
By taking the time to measure and cut your slats accurately, you ensure they will fit perfectly and provide consistent support for your mattress. In the next section, we’ll cover how to prepare the slats for installation, including any additional treatments or modifications needed.
4. Preparing the Slats
Once you’ve measured and cut the slats to size, the next step is to prepare them for installation. This involves smoothing the edges, applying any optional treatments, and ensuring they are ready to be placed in your bed frame.
Sanding the Slats
- Smooth the Edges: Use medium-grit sandpaper to smooth out any rough edges and surfaces of the slats. This step is crucial to prevent splinters and ensure a comfortable surface for your mattress.
- Sand along the edges and corners until they feel smooth to the touch.
- Remove Dust: After sanding, wipe down each slat with a damp cloth to remove any sawdust or debris. This prepares the wood for any optional treatments or finishes.
Optional Treatments
- Applying a Finish: If desired, you can apply a wood finish or sealant to the slats. This not only enhances the appearance of the wood but also protects it from moisture and wear over time.
- Choose a finish that is compatible with the type of wood you are using and follow the manufacturer’s instructions for application.
- Allow for Drying: If you apply a finish, allow the slats to dry completely before proceeding to the installation step. This ensures the finish cures properly and won’t transfer onto your mattress.
Checking for Quality
- Inspect Each Slat: Before installing, inspect each slat for any imperfections or rough spots that may need further sanding or adjustment.
- Ensure that all slats are uniform in size and free from defects that could affect their performance.
- Testing Fit: Place the slats within the bed frame to test their fit. They should lay flat and snugly fit across the width of the frame without gaps.
- Make any necessary adjustments to ensure a proper fit before proceeding.
Benefits of Preparation
Preparing your slats ensures they are ready to provide optimal support for your mattress. Smooth edges and a protective finish not only enhance the appearance of your bed but also contribute to its longevity and comfort. In the next section, we’ll cover how to assemble and install the slats into your bed frame, ensuring a secure and stable foundation for your mattress.
Also Read: How to Install Bunkie Board on Platform Bed
5. Assembling and Installing the Slats
Now that you’ve prepared the slats, it’s time to assemble and install them into your bed frame. Follow these steps to ensure a secure and stable foundation for your mattress:
Positioning the Slats
- Even Spacing: Begin by placing the slats across the width of your bed frame with even spacing between each one. A typical spacing is about 2-3 inches apart, but adjust as needed for optimal support.
- Use a measuring tape to ensure consistent spacing between each slat.
- Orientation: Position the slats so that the smooth, sanded side faces upward. This provides a comfortable surface for your mattress and prevents any rough edges from contacting the mattress.
Securing the Slats

- Attachment Methods: Depending on your bed frame and personal preference, there are several methods to secure the slats:
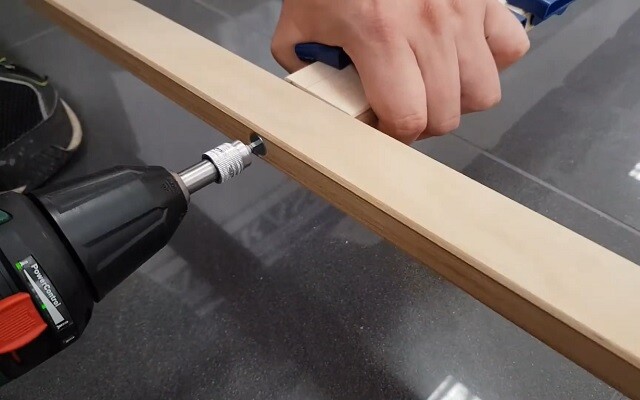
- Screws: Drill pilot holes and secure each slat to the bed frame using screws. This method provides a sturdy attachment and prevents slippage.
- Brackets: Use metal brackets to secure the slats to the bed frame. This method allows for easy removal and adjustment if needed.
- Ensuring Stability: As you attach each slat, check for stability and adjust as necessary to ensure they are securely fastened to the bed frame.
- Tighten screws or adjust brackets to eliminate any wobbling or movement of the slats.
Testing the Setup
- Weight Distribution: Once all slats are installed, gently press down on various points of the bed to test the stability and weight distribution.
- Ensure the slats provide even support across the entire surface of the mattress.
- Checking for Fit: Double-check that all slats fit snugly within the bed frame without gaps or overhang. This ensures a secure foundation for your mattress.
Final Adjustments
- Fine-tuning: Make any final adjustments to the slats or attachment points to achieve optimal support and stability.
- Recheck spacing and alignment to ensure the slats are positioned correctly.
- Safety Precautions: Before placing your mattress on the slats, ensure all screws or brackets are securely tightened to prevent accidents or injury.
By following these steps, you’ll create a sturdy and durable foundation for your mattress with custom-made bed slats. In the next section, we’ll cover common issues that may arise and how to troubleshoot them to ensure your bed slats provide long-lasting comfort and support.
6. Troubleshooting Common Issues
While assembling and installing your bed slats, you may encounter some common issues. Here’s how to troubleshoot and resolve them for a smooth DIY process:
Adjusting for Fit
- Slats Too Tight or Loose: If the slats are too tight or loose within the bed frame, adjust the spacing or trim the slats accordingly.
- Use a saw to trim slats that are slightly too long, ensuring they fit snugly without forcing them into place.
- Uneven Surface: If the slats create an uneven surface or do not provide adequate support, check for inconsistencies in spacing or alignment.
- Realign slats and ensure they are evenly spaced to distribute weight evenly across the mattress.
Dealing with Sagging
- Additional Support: If you notice sagging in the middle of the bed, consider adding additional support in the form of a central leg or thicker slats.
- Install a support leg underneath the center of the bed frame to provide additional reinforcement.
- Upgrading Slats: For prolonged durability, consider upgrading to thicker or sprung slats that offer more flexibility and support.
Checking Stability
- Wobbling or Movement: If the bed slats wobble or move when pressure is applied, check the attachment points (screws or brackets) for tightness.
- Tighten screws or brackets to secure the slats firmly to the bed frame.
- Reinforcing Weak Points: Identify any weak points in the slats or bed frame and reinforce them with additional screws or brackets if necessary.
- Ensure all attachment points are secure to prevent slats from shifting or becoming dislodged.
Routine Maintenance
- Regular Inspections: Periodically inspect the bed slats and attachment points for signs of wear or loosening.
- Tighten screws as needed and replace any damaged slats to maintain optimal support.
- Cleaning and Care: Keep the slats clean and free of dust to prolong their lifespan. Use a damp cloth to wipe down the slats periodically.
Conclusion
By following these troubleshooting tips, you can address common issues and ensure your DIY bed slats provide long-lasting comfort and support for your mattress. Remember to regularly inspect and maintain your bed slats to extend their lifespan and optimize your sleep experience.
Also Visit Bedding Expertise for more informational topics on bedding niche
Share this:
- Click to share on Facebook (Opens in new window) Facebook
- Click to share on X (Opens in new window) X
- Click to email a link to a friend (Opens in new window) Email
- Click to share on LinkedIn (Opens in new window) LinkedIn
- Click to share on Reddit (Opens in new window) Reddit
- Click to share on X (Opens in new window) X
- Click to share on Tumblr (Opens in new window) Tumblr
- Click to share on Pinterest (Opens in new window) Pinterest
- Click to share on Pocket (Opens in new window) Pocket
- Click to share on Telegram (Opens in new window) Telegram
- Click to share on WhatsApp (Opens in new window) WhatsApp
- Click to share on Nextdoor (Opens in new window) Nextdoor
