How To Efficiently Dismantle And Move Your Bed Frame
When it comes to how to efficiently dismantle and move your bed frame, it can be a stressful experience, especially when it comes to dismantling and transporting bulky furniture like a bed frame. However, with the right tools, techniques, and a bit of preparation, you can efficiently dismantle and move your bed frame without any hassle. This comprehensive guide will walk you through each step, ensuring a smooth transition.
Tools and Materials Needed

Before you start dismantling your bed frame, it’s essential to gather all the necessary tools and materials. Having everything on hand will make the process much smoother and prevent unnecessary interruptions.
Essential Tools:
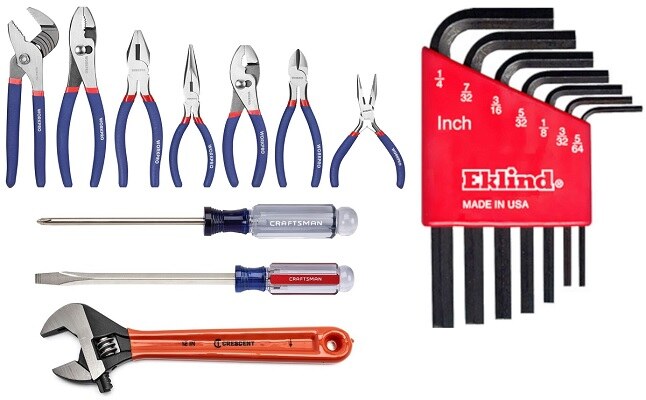
- Screwdrivers: Both flathead and Phillips screwdrivers are commonly needed.
- Adjustable Wrench: Adjustable or appropriate-sized wrenches for bolts.
- Pliers: Useful for gripping and turning screws or bolts.
- Allen Keys: Often required for beds with specific screws.
Additional Materials:
- Moving Blankets: To protect the bed frame parts during transport.
- Ziplock Bags: For storing screws, bolts, and small parts.
- Tape and Markers: For labeling parts and keeping everything organized.
- Bubble Wrap: For extra protection of delicate parts.
By being well-prepared with the right tools and materials, you set the stage for a smooth and efficient dismantling process.
Preparation Before Dismantling
Proper preparation is crucial for efficiently dismantling and moving your bed frame. Taking the time to get organized beforehand can save you a lot of trouble and ensure that the process goes smoothly.
Clear the Area:
- Remove Obstacles: Clear the area around the bed to create a spacious and safe working environment. Move nightstands, lamps, and other furniture out of the way.
- Vacuum the Floor: Clean the floor around the bed to avoid dust and debris getting onto your bed frame parts.
Remove Bedding and Mattress:
- Strip the Bed: Remove all bedding, including sheets, blankets, pillows, and mattress toppers. This will give you full access to the bed frame.
- Move the Mattress: Carefully lift and move the mattress and box spring to another room or a safe area. If the mattress is heavy, get help to avoid injury.
Take Reference Photos:
- Photograph the Bed Frame: Take detailed photos of the bed frame from different angles. Pay special attention to joints, connections, and hardware. These photos will be invaluable when reassembling the bed.
- Document Hardware Placement: Capture close-up shots of screws, bolts, and brackets in their original positions. This will help you remember where each piece belongs.
Organize Tools and Materials:
- Set Up a Work Area: Designate a nearby space where you can place your tools and materials. This will keep everything within reach and make the process more efficient.
- Label and Bag Hardware: As you begin to dismantle the bed, place screws, bolts, and small parts in labeled ziplock bags. Use tape and markers to label each bag according to its corresponding part of the bed frame.
Safety Precautions:
- Wear Gloves: Protect your hands by wearing gloves, especially when handling heavy or sharp parts.
- Lift Carefully: Use proper lifting techniques to avoid back strain. Bend your knees and keep your back straight when lifting heavy items.
By preparing thoroughly before you start dismantling your bed frame, you ensure a smoother and more efficient process. This preparation phase sets the foundation for a successful move and helps prevent any damage or loss of parts.
Let’s get started on how to efficiently dismantle and move your bed frame!
Step-by-Step Guide to Dismantling the Bed Frame
Dismantling a bed frame may seem daunting, but by following a systematic approach, you can make the process efficient and straightforward. Here’s a detailed step-by-step guide to help you dismantle different types of bed frames safely and effectively.
Step 1: Read the Manufacturer’s Instructions
- Locate the Manual: If you have the bed frame’s manual, review the dismantling instructions specific to your bed model. This will provide valuable guidance and tips.
- Online Resources: If you don’t have the manual, look for instructions online. Many manufacturers provide digital copies or instructional videos.
Step 2: Remove the Mattress Support System

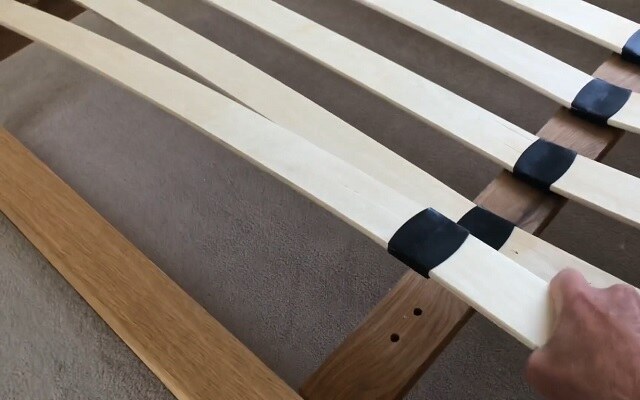
- Slats or Platform: If your bed has slats, lift them out one by one and set them aside. For platform beds, remove the platform panels carefully.
- Storage Beds: If your bed frame has drawers or storage compartments, empty and remove them before proceeding.
Step 3: Loosen and Remove Screws and Bolts
- Identify Fasteners: Locate all screws, bolts, and brackets that hold the bed frame together. Use the appropriate screwdriver or wrench to loosen them.
- Organize Hardware: Place screws, bolts, and small parts in labeled ziplock bags. Group them by section (e.g., headboard, footboard) and label accordingly.
Step 4: Disassemble the Bed Frame Components
- Headboard and Footboard: Start with the headboard and footboard. Carefully detach them from the side rails. If they are particularly heavy, ask for assistance.
- Side Rails: Remove the side rails from the bed frame. These are often the longest pieces and may require extra handling.
- Center Support (if applicable): Some bed frames have a center support beam. Detach this component last.
Step 5: Handle Different Bed Frame Types
- Wooden Bed Frames: For wooden frames, be gentle to avoid splintering. Use a soft cloth to wrap delicate parts.
- Metal Bed Frames: For metal frames, ensure all screws and bolts are fully removed before pulling apart sections to avoid bending or warping.
Step 6: Wrap and Protect Bed Frame Parts
- Use Moving Blankets: Wrap larger parts like the headboard, footboard, and side rails in moving blankets. Secure them with packing tape to prevent scratches and dents.
- Bubble Wrap for Delicate Parts: For fragile components, use bubble wrap for added protection. This is especially important for ornate wooden or metal designs.
Step 7: Label and Store Parts
- Label Each Piece: Use tape and markers to label each part of the bed frame. Include notes on orientation and placement if necessary.
- Store Securely: Place all wrapped and labeled parts in a secure area where they won’t be damaged or misplaced.
Safety Tips:
- Work Slowly and Carefully: Take your time with each step to avoid damaging the bed frame or injuring yourself.
- Get Help: If the bed frame is large or heavy, don’t hesitate to ask for assistance. Having an extra set of hands can make the process much easier and safer.
By following these detailed steps, you can efficiently dismantle your bed frame, ensuring that all parts are kept safe and organized for easy reassembly. This methodical approach minimizes the risk of damage and makes the entire moving process smoother.
Packing the Bed Frame Parts
Once you have successfully dismantled your bed frame, the next crucial step is to pack the parts securely for transportation. Proper packing ensures that all components arrive at your new location undamaged and ready for reassembly. Here’s how to pack your bed frame parts efficiently.
Step 1: Gather Packing Materials
- Moving Blankets: Use these to wrap larger pieces like the headboard, footboard, and side rails.
- Bubble Wrap: Ideal for wrapping smaller, delicate parts and any intricate designs.
- Packing Tape: To secure blankets and bubble wrap around the parts.
- Cardboard Pieces: Place between parts for additional protection.
- Ziplock Bags: For screws, bolts, and other small hardware.
- Labels and Markers: For clear labeling of each part and hardware bag.
Step 2: Wrap Larger Parts
- Headboard and Footboard: Wrap these pieces in moving blankets. Secure the blankets with packing tape, ensuring that the entire surface is covered to prevent scratches and dents.
- Side Rails and Center Support: Follow the same wrapping process. If side rails are particularly long, you might need multiple blankets or bubble wrap to cover them completely.
Step 3: Protect Smaller Parts
- Delicate Components: Use bubble wrap for smaller parts and any decorative elements. Wrap each piece individually and secure with tape.
- Hardware Bags: Place screws, bolts, and small hardware in labeled ziplock bags. Group them according to the part of the bed frame they belong to (e.g., “Headboard Screws,” “Side Rail Bolts”).
Step 4: Additional Protection
- Cardboard Pieces: Insert pieces of cardboard between larger parts, such as the headboard and footboard, to prevent them from rubbing against each other during transit.
- Corner Protection: Pay extra attention to corners and edges, using additional layers of bubble wrap or cardboard to prevent damage.
Step 5: Label Everything Clearly
- Parts Labeling: Use markers and labels to clearly mark each wrapped part. Include notes on orientation (e.g., “Headboard Top”) if necessary.
- Hardware Labeling: Ensure all ziplock bags are labeled with their contents and corresponding bed frame parts. This will make reassembly much easier.
Step 6: Load Securely for Transport
- Placement in Vehicle: Place the largest parts first, such as the headboard and footboard, against the walls of the moving vehicle to prevent shifting. Lay side rails and other long parts flat to avoid bending.
- Secure the Load: Use ropes or straps to secure the bed frame parts in place, preventing movement during transit.
Step 7: Unloading and Storage
- Careful Unloading: When you arrive at your destination, unload the parts carefully, ensuring they are placed in a safe, dry area until you’re ready to reassemble the bed.
- Temporary Storage: If you need to store the bed frame parts for an extended period, ensure they are kept in a clean, dry space to prevent any damage from moisture or pests.
Safety Tips:
- Lift Properly: Use proper lifting techniques when handling heavy parts to avoid injury. Bend at the knees, not the waist, and get help if needed.
- Avoid Overpacking: Don’t pack parts too tightly in the vehicle. Allowing some space prevents pressure damage during transit.
By carefully packing each component of your bed frame, you ensure that everything remains in excellent condition during the move. This meticulous approach simplifies the reassembly process and helps avoid any unnecessary damage.
Moving the Packed Bed Frame Parts

Once your bed frame parts are securely packed, the next step is to move them safely to your new location. Follow these tips for an efficient and damage-free move:
- Lift Properly: Use proper lifting techniques to avoid injury. Bend at the knees and lift with your legs, not your back. If parts are heavy, ask for assistance.
- Load Strategically: Place the largest parts, such as the headboard and footboard, against the walls of the moving vehicle. Lay side rails and long parts flat to prevent bending or warping.
- Secure the Load: Use ropes or straps to secure the bed frame parts in the moving vehicle, ensuring they do not shift during transit.
- Handle with Care: Be cautious when loading and unloading, avoiding any sudden movements that could cause damage.
- Unpack Gently: Upon arrival, carefully unload each part and place them in a safe, dry area until you’re ready to reassemble the bed frame.
By following these steps, you can ensure that all parts of your bed frame remain intact and ready for reassembly at your new location.
Conclusion
Efficiently dismantling and moving your bed frame can seem like a daunting task, but with the right approach, it can be manageable and stress-free. By following the detailed steps outlined in this guide, from gathering the necessary tools to carefully packing and moving the parts, you ensure that your bed frame is well-protected and ready for reassembly in your new home.
Remember to label all parts clearly, handle components with care, and secure everything properly during the move. With these precautions, you’ll minimize the risk of damage and make the reassembly process smoother.
Also Read: 5 Easy DIY Steps on How to Fix a Broken Bed Rail
Also Visit Bedding Expertise for more valueable information on bedding topics
