Upgrade Bottom Storage Bed with Plywood Top: A Practical Guide for DIY Lovers
Upgrading the bottom storage of your bed with a plywood top is an efficient and cost-effective solution for creating extra space and enhancing the overall durability of your bed frame. Whether you’re looking to declutter your bedroom or just want a sturdier, more organized space to store belongings, this DIY project is ideal for both beginners and seasoned DIY enthusiasts. With plywood, you can transform your bed into a functional piece of furniture that not only looks great but serves multiple purposes.
Let’s dive into how you can upgrade bottom storage bed with plywood top while covering all the essential steps, materials, and design ideas to make your project a success.
Section 1: Why Upgrade Your Bed’s Bottom Storage?
Many modern beds come with built-in storage, but these compartments are often flimsy or underutilized. Over time, wear and tear on these storage spaces can make them less functional, leading to sagging bases or insufficient support for heavy items.
By upgrading the bottom storage with a plywood top, you’re solving a number of common problems:
- Better Weight Distribution: Plywood provides a solid surface, making it easier to store heavier items without causing sagging or damage to the bed frame.
- Enhanced Organization: Having a flat, durable surface allows you to store items like clothing, shoes, and bedding more efficiently. You won’t have to worry about items getting crushed or moving around.
- Maximized Space: Many beds have unused space underneath them. With the addition of a plywood top, you can fully utilize that space for storage.
Aside from practical benefits, upgrading your bed’s storage with plywood gives you more freedom in terms of customization. You can adjust the dimensions, look, and feel to match your specific needs and aesthetic preferences.
Key Takeaways:
- Plywood enhances weight distribution and prevents sagging.
- Helps maximize storage space by offering a solid, usable surface.
- Easy to customize, offering both functional and aesthetic improvements.
Section 2: Why Use Plywood for the Upgrade?
Plywood is an ideal material for DIY furniture upgrades, particularly when it comes to creating a strong, stable foundation for bed storage. Here’s why plywood is the go-to choice for this project:
- Affordability: Compared to hardwood or metal, plywood is a budget-friendly material that doesn’t compromise on durability. You can upgrade your bed without breaking the bank.
- Strength and Stability: Plywood is made by layering thin sheets of wood veneer, creating a cross-grain structure that is exceptionally strong and resistant to warping. This makes it perfect for supporting the weight of both the bed and the storage beneath it.
- Ease of Customization: Plywood is easy to cut, shape, and finish according to your preferences. Whether you want a raw, natural look or plan to paint or stain it to match your bedroom decor, plywood offers endless possibilities.
- Eco-Friendly Option: Many plywood products come from sustainable sources, meaning you can upgrade your bed in an environmentally conscious way.
When selecting plywood for your bed storage upgrade, opt for at least ¾-inch thick sheets. This thickness ensures that the plywood can handle the weight of stored items without flexing or breaking over time. Additionally, consider using high-quality, furniture-grade plywood for a smooth finish that’s easier to paint or stain.
Key Takeaways:
- Plywood is cost-effective and strong, making it ideal for bed storage upgrades.
- It is easily customizable, giving you control over both functionality and design.
- Sustainable and eco-friendly options are available.
Section 3: Step-by-Step Guide to Upgrade Bottom Storage Bed with Plywood Top
Now that you understand the benefits and potential pitfalls of upgrading your bed’s storage with a plywood top, it’s time to get into the step-by-step process of how to complete this DIY project. Follow these instructions carefully to ensure a smooth and successful upgrade.
Step 1: Gather Your Materials

Before starting, make sure you have all the necessary materials and tools:
- ¾-inch plywood sheet (cut to size)
- Measuring tape
- Pencil
- Circular saw or jigsaw (for cutting plywood)
- Sandpaper (120-grit or higher)
- Screws or brackets (if securing the plywood)

- Power drill or screwdriver

- Paint or stain (optional)
- Paintbrush or roller
Step 2: Measure the Bottom Storage Area
Measure the dimensions of the bottom storage area of your bed carefully. Be precise, as the plywood top needs to fit snugly within the frame. Double-check the width and length, and make note of any odd angles or irregularities. It’s better to measure twice than to cut incorrectly.
Step 3: Cut the Plywood to Size
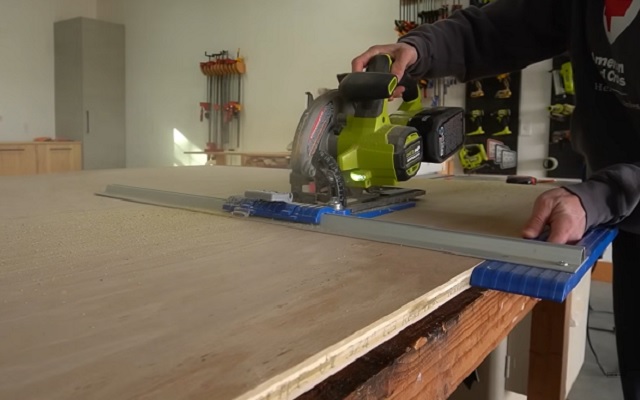
Using a circular saw or jigsaw, carefully cut the plywood to the dimensions you measured. If you don’t have a saw at home, most home improvement stores offer cutting services when you purchase plywood. Make sure the edges are clean and straight after cutting.
Step 4: Sand the Edges
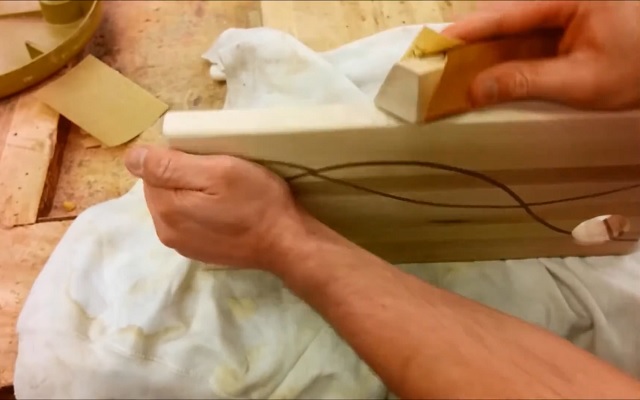
After cutting, use fine-grit sandpaper (120-grit or higher) to sand the edges of the plywood. This step is crucial to prevent splinters and rough edges that can catch on bedding or cause injury. Sand all the way around the edges until they feel smooth.
Step 5: Test the Fit
Place the plywood on top of the bottom storage area to test the fit. It should sit flush with the bed frame without any large gaps or unevenness. If the plywood is too large, trim it down slightly and sand the edges again.
Step 6: Secure the Plywood (Optional)
If you want the plywood top to be permanent, use screws or brackets to secure it in place. Drill evenly spaced holes along the edges and carefully insert screws to attach the plywood securely to the bed frame. If you prefer a removable top, make sure the plywood fits snugly enough to stay in place on its own.
Step 7: Add a Finish (Optional)
For a polished look and to protect the plywood, apply paint, stain, or varnish to the surface. Use a paintbrush or roller to apply the finish in even strokes, allowing it to dry completely before using the bed. This will help prevent moisture damage and improve the overall aesthetic.
Step 8: Ensure Proper Ventilation
If your bed storage area is completely sealed off, it’s a good idea to drill small ventilation holes in the plywood to allow for air circulation. This will prevent moisture build-up, which could lead to mold or musty odors.
Key Takeaways:
- Measuring and cutting the plywood accurately is crucial for a seamless fit.
- Attaching the plywood securely ensures stability and long-term durability.
- Custom finishes can enhance the look and feel of your bed’s storage area.
Also Read: Upgrade Existing Bottom Storage Bed with Plywood Top IN 5 Easy DIY Steps
Section 4: Design Ideas for Aesthetic Upgrades
While upgrading the bottom storage of your bed with a plywood top is primarily a functional improvement, it also presents an opportunity to enhance the overall aesthetic of your bedroom. With a little creativity, your bed can become a focal point that complements the decor while offering additional functionality. Here are some design ideas to inspire you:
1. Stained Plywood for a Natural, Rustic Look
One of the easiest ways to elevate the appearance of your plywood top is to stain it. Staining enhances the natural grain of the plywood, giving it a warm, rustic look. You can choose from a variety of stain colors to match your room’s decor—lighter tones work well in modern, minimalist settings, while darker stains add richness to more traditional or cozy spaces.
Pro Tip: Pair stained plywood with earth-toned bedding and natural textures like linen or cotton for a cohesive, organic aesthetic.
2. Painted Plywood for a Pop of Color
For a bolder design, consider painting the plywood top in a vibrant or pastel color that complements your room’s palette. A bright color like teal, mustard, or deep blue can add personality to your bedroom, while softer hues like blush pink, sage green, or light gray create a more soothing atmosphere.
You can even use the plywood top as a canvas for geometric patterns or artistic designs, which adds a unique touch to the storage bed.
Pro Tip: Choose paint that’s durable and easy to clean, especially if the plywood top will be used frequently or exposed to potential stains.
3. Upholstered Plywood for a Luxurious Feel
For a touch of luxury, upholstering the plywood top is an excellent option. You can cover it with foam padding and fabric, creating a plush surface that feels soft and inviting. Velvet, faux leather, or even linen are popular upholstery materials that not only add texture but also elevate the overall look of your bed.
This design idea is perfect if you use your bed storage as a seating area or want a more sophisticated, cozy vibe in the bedroom.
Pro Tip: Choose fabrics that are durable and resistant to wear, especially if the upholstered plywood will be used for sitting or resting items.
4. Decal or Wallpaper Accent
For a quick, affordable design upgrade, consider applying decals or wallpaper to the plywood top. This is a non-permanent option that allows you to experiment with patterns, textures, and designs. From florals and abstract prints to metallic accents and marble textures, the possibilities are endless.
Decals or wallpaper can easily be removed or replaced if you want to switch up your decor in the future, making this an ideal option for renters or those who like to refresh their space frequently.
Pro Tip: Ensure that the surface of the plywood is smooth before applying decals or wallpaper for a professional-looking finish.
5. Integrated Storage Compartments
If you’re looking for a more advanced design upgrade, consider incorporating storage compartments or drawers within the plywood top. This adds even more functionality to your bed, allowing you to store smaller items like books, electronics, or personal belongings. With the right design, these compartments can blend seamlessly into the plywood top for a sleek, modern appearance.
Pro Tip: Use drawer pulls or handles that match the style of your room, such as minimalist metal handles for a modern look or vintage brass knobs for a more classic aesthetic.
Key Takeaways:
- Stain or paint the plywood for a customized, stylish look.
- Consider upholstery for a luxurious, soft feel.
- Decals or wallpaper are non-permanent, creative options for personalization.
- Integrated storage compartments enhance functionality without sacrificing design.
Also Read: DIY Guide: How to Lower a Bed Frame in 4 Easy Steps
Section 5: Advantages of Adding a Plywood Top to Your Storage Bed
Upgrading your bed’s bottom storage with a plywood top comes with a range of benefits that go beyond just enhancing storage. It offers both functional and aesthetic advantages that improve the overall quality of your bed and bedroom space. Here’s how:
1. Improved Durability and Longevity
One of the most significant advantages of adding plywood to your storage bed is the increased durability. Plywood is known for its strength and resistance to wear and tear, making it an excellent material for withstanding the weight of heavy items. By using a plywood top, you’re giving your bed a solid foundation that can handle the demands of daily use without bending or sagging over time.
2. Stability for Heavy Storage Items
Storage beds are often used to keep items like blankets, pillows, and clothes. However, without a stable surface, heavier items like books, electronics, or seasonal gear may cause the storage compartments to weaken. Plywood provides a sturdy, flat surface that distributes the weight of heavy objects evenly, preventing the storage area from becoming compromised.
3. Cost-Effective Solution
Upgrading the bottom storage of your bed with plywood is an affordable yet highly effective solution. Instead of purchasing a new bed frame or expensive storage units, you can transform your existing bed with a simple plywood addition. The affordability of plywood means you can achieve a high-quality upgrade without going over budget.
4. Customization Flexibility
Adding a plywood top gives you the opportunity to personalize your storage space. Whether you want to paint it to match your room’s decor, stain it for a natural wood look, or even add creative elements like wallpaper or decals, plywood is easy to customize. This allows you to enhance the aesthetic of your bedroom without sacrificing functionality.
5. Reduced Clutter and Enhanced Organization
With the solid surface provided by the plywood top, you can better organize the items stored under your bed. Loose items will no longer shift or fall through gaps, and you’ll have a cleaner, more organized space. This upgrade not only improves storage but also reduces clutter in your room, giving you more peace of mind.
6. Eco-Friendly Choice
Many plywood sheets are made from sustainable sources, making this an eco-friendly option for upgrading your bed. By choosing environmentally-friendly plywood, you contribute to reducing deforestation and using renewable materials in your DIY projects.
Key Takeaways:
- Plywood enhances the durability and stability of your storage bed.
- It’s a cost-effective solution for improving your bed’s storage capabilities.
- Offers plenty of customization options to suit your style.
- Helps reduce clutter and improve organization.
Also Read: How to Repurpose a Bed into a Futon: 5 Easy DIY Steps
Section 6: Common Mistakes to Avoid When Upgrading Bed Storage with Plywood
While upgrading your bed’s bottom storage with plywood is a relatively straightforward project, there are some common mistakes that can lead to a less-than-ideal result. By being aware of these potential pitfalls, you can ensure your project is successful and long-lasting.
1. Using the Wrong Plywood Thickness
One of the most frequent mistakes is using plywood that’s too thin. If you use plywood thinner than ¾ inch, it may not provide enough support for heavier items stored underneath the bed. This can lead to sagging, cracking, or warping over time. Always opt for thicker plywood to ensure the upgrade can handle the weight and usage demands.
2. Inaccurate Measurements
Precision is key when it comes to cutting plywood to fit the bottom storage of your bed. Measuring inaccurately, or not double-checking your dimensions, can result in gaps, uneven surfaces, or plywood that doesn’t fit properly. Be sure to measure your bed frame and storage compartments carefully, and double-check your numbers before cutting.
3. Poor Attachment of the Plywood Top
Another common mistake is failing to secure the plywood top properly. If the plywood is not attached securely, it can shift over time, leading to instability and potential damage. Make sure to use appropriate screws or brackets to fix the plywood in place. If you want the plywood top to be removable, make sure it fits snugly enough to stay in place without screws.
4. Neglecting to Sand the Edges
Plywood edges can be rough and splintered after cutting. Failing to sand these edges smooth can lead to injury (splinters) and damage to the bedding or items stored underneath. Be sure to sand all edges with fine-grit sandpaper (120-grit or higher) to ensure a smooth, safe surface.
5. Overlooking the Finish
Some people may skip finishing their plywood altogether, leaving it rough and prone to moisture damage. Plywood that is left unfinished is vulnerable to warping and staining, especially in humid environments. Applying a coat of paint, stain, or varnish not only enhances the look of the plywood but also protects it from moisture and wear.
6. Not Planning for Ventilation
When upgrading your bed’s bottom storage, it’s easy to overlook ventilation. If the storage compartments are sealed too tightly with the plywood top, it can trap moisture and odors, especially if you’re storing bedding, clothes, or other fabric items. Consider drilling small ventilation holes or leaving some space between the plywood and the bed frame to allow air circulation.
Key Takeaways:
- Always use ¾-inch or thicker plywood for durability and support.
- Double-check measurements to avoid cutting errors.
- Secure the plywood top properly and ensure all edges are sanded smooth.
- Don’t forget to apply a protective finish to the plywood.
- Plan for proper ventilation to prevent moisture build-up in storage.
Section 7: Maintenance and Care for Your Upgraded Bed Storage
After upgrading the bottom storage of your bed with a plywood top, proper maintenance and care are crucial to keep it looking its best and ensure it remains functional for years to come. Here’s a guide to help you maintain your newly upgraded bed storage:
1. Regular Cleaning
Plywood is relatively low-maintenance, but regular cleaning is still essential to keep dust and dirt at bay. Wipe the surface of the plywood top with a soft cloth or microfiber duster to remove any accumulated debris. For deeper cleaning, use a damp cloth with mild soap and water, but be sure to wring out excess moisture to avoid damaging the plywood.
Pro Tip: Avoid using harsh chemicals or abrasive cleaners, as these can damage the finish or cause the plywood to warp over time.
2. Protecting the Surface
If you’ve opted to leave the plywood top unfinished or with a natural wood stain, consider applying a protective coating, such as polyurethane or varnish, to prevent scratches, moisture damage, and wear. These coatings add a layer of protection that makes the surface more durable, especially in high-traffic areas.
For painted or upholstered plywood tops, be mindful of sharp objects or spills that could damage the finish or fabric. Consider using placemats or trays to protect the surface when placing items on top.
Pro Tip: Reapply protective coatings every year or as needed to maintain the integrity of the plywood.
3. Preventing Moisture Build-Up
Since your bed’s bottom storage may be enclosed, it’s essential to monitor for moisture build-up, which can lead to mold or mildew. Ensure that there is adequate ventilation, either through small drilled holes or by leaving slight gaps between the plywood and the bed frame. If you live in a humid area, consider using moisture-absorbing products, such as silica gel packets, to keep the storage area dry.
Pro Tip: Regularly check the items stored under your bed for signs of moisture damage and clean the area as necessary.
4. Repairing Minor Damage
Over time, your plywood top may experience minor damage, such as scratches or dents. Luckily, these can be easily repaired with wood filler and a light sanding. For deeper scratches, use a fine-grit sandpaper to smooth the area before reapplying stain, paint, or a protective finish.
For upholstered plywood tops, check the fabric regularly for wear or tear. If you notice any fraying or damage, you can reupholster the top with fresh fabric or patch small areas with matching material.
Pro Tip: Always keep leftover paint or fabric for touch-ups or repairs to maintain the consistent look of your bed upgrade.
5. Inspecting the Structure
Periodically check the plywood top for signs of structural wear, such as warping, sagging, or loose attachments. If the plywood begins to warp due to weight or moisture exposure, it’s best to replace it before the damage worsens. Similarly, if screws or brackets have loosened, tighten them to ensure the plywood top remains secure.
Key Takeaways:
- Clean the plywood regularly with a soft cloth and avoid harsh chemicals.
- Apply protective coatings to prevent wear and moisture damage.
- Monitor the bed storage area for moisture build-up and ensure proper ventilation.
- Repair minor scratches or fabric damage promptly to maintain aesthetics.
- Regularly inspect the plywood for structural integrity and tighten attachments if necessary.
Conclusion
Upgrading your bed’s bottom storage with a plywood top is a smart way to enhance both functionality and style in your bedroom. By selecting the right plywood thickness, applying a stylish finish, and following proper maintenance practices, you can create a visually appealing and durable addition to your bed. Whether you choose to stain, paint, or upholster the plywood, each option offers unique benefits that can complement your room’s decor. Remember to take accurate measurements and consider design elements that align with your personal taste. With thoughtful planning and care, your upgraded bed storage will provide both aesthetic appeal and practical storage solutions for years to come.
FAQ’s
Q1: What type of plywood should I use for upgrading bed storage?
A1: For durability and support, use ¾-inch thick plywood. This thickness is sturdy enough to handle weight and prevent sagging or warping over time. Choose high-quality plywood to ensure longevity and stability.
Q2: How do I measure the bottom storage area accurately?
A2: Measure the width, length, and any irregularities of the bottom storage area of your bed. Use a measuring tape and double-check your dimensions before cutting the plywood. Precision is crucial to ensure a perfect fit.
Q3: Can I paint or stain plywood myself?
A3: Yes, you can paint or stain plywood yourself. For painting, use a high-quality paint and apply multiple coats for even coverage. For staining, apply a wood stain and finish with a protective coating like polyurethane to enhance durability.
Q4: How can I maintain and care for my upgraded bed storage?
A4: Regularly clean the plywood surface with a soft cloth or damp rag. Apply protective coatings to prevent moisture damage, and monitor for any signs of wear or damage. Ensure proper ventilation to prevent moisture build-up and inspect the structure periodically for stability.
Q5: Can I add storage compartments to the plywood top?
A5: Yes, you can integrate storage compartments or drawers into the plywood top. This design enhancement adds functionality by allowing you to store smaller items. Ensure the compartments blend seamlessly with the plywood top for a polished look.
Q6: What should I do if the plywood top starts to warp or sag?
A6: If you notice warping or sagging, check for moisture exposure or excessive weight. Replace the plywood if necessary and ensure proper ventilation and support. Regular inspection and maintenance can help prevent such issues.
Q7: Are there any design ideas for a more luxurious look?
A7: Consider upholstering the plywood top with plush fabrics like velvet or faux leather for a luxurious feel. You can also use decorative decals or wallpaper for a stylish upgrade. Experiment with finishes that complement your bedroom decor for a cohesive look.
Visit Bedding Expertise for more valueable information on bedding topics!

Pingback: What Is A Marshmallow Bed Frame? A Comprehensive Guide - Bedding Expertise